
>> Zur deutschen Version dieses Beitrags gehen
Rainwater is now a precious commodity. Last year we got a 5,000 litre rainwater cistern from Rewatec. It’s rarely worth having something like this installed just for the rainwater, as the effort and costs are considerable.
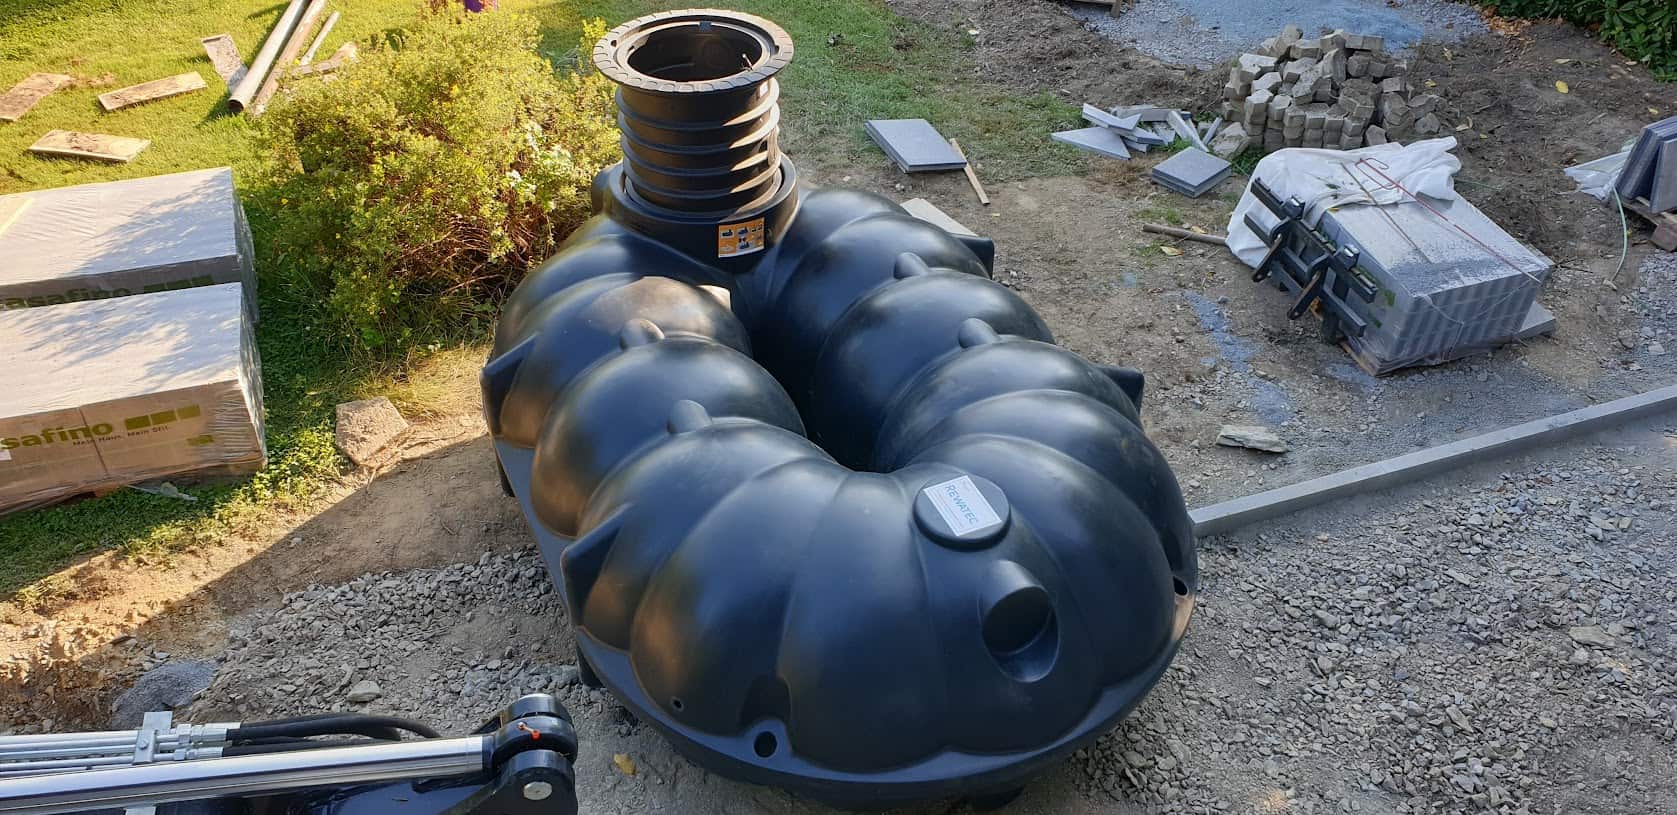
However, when renovating our patio, we realised that our guttering was dilapidated and the digger was already there anyway, so the cistern could be installed with little effort. The rain that falls on the 75 square metres of the south side of the roof now flows into it – if it rains at all …
We feed our Gardena sprinklers from the cistern, which are supplied by a Renkforce submersible pump (which has been in service for 5-7 years). Of course, we want to know how much water is in the cistern so that we can then control the irrigation. In addition, the submersible pump needs a minimum fill level of 8 cm so that it does not run dry.
DIY solutions usually unreliable
There are several DIY approaches for measuring the water level, but they often work rather poorly. Ultrasonic sensors that are aimed at the water surface not only suffer from the damp environment and then fail, but often do not measure correctly due to reflections. The same applies to optical TOF (Time of Flight) sensors. Capacitive sensors tend to measure inaccurately, as impurities change the dielectric constant of the water. I also experimented with this, but quickly abandoned it.
Cascades with reed relays and resistors and a float with a magnet work well and are robust, but only have a very coarse resolution. This is rather unsatisfactory for a cistern that can reach a maximum level of 1.05 metres.
Floats with pulleys and rope on a potentiometer are too adventurous.
Pressure sensors, on the other hand, are very accurate. Small pressure sensors, such as those built into blood pressure monitors, would be sufficient for the application and are quite inexpensive. However, they do not take into account the variable air pressure acting on the water column and do not provide accurate readings, and the hose to the sensor is also prone to clogging.
TL-136 pressure sensor as a solution
Piezoelectric pressure sensors, the TL-136 liquid level transducer, are not quite as inexpensive, but are robust and accurate. These also have a small tube in the supply line that allows the external pressure to flow into the measurement. These sensors are available for various filling levels for around 50 euros. For this you get a solid stainless steel housing with a very simple control unit. The sensor is simply placed at the bottom of the cistern or tank. I chose the 0-1 metre model as the overflow of my cistern is already at 105 cm. The 0-1 metre model should also be suitable for the popular IBC containers, as you don’t let them fill up to the last centimetre.
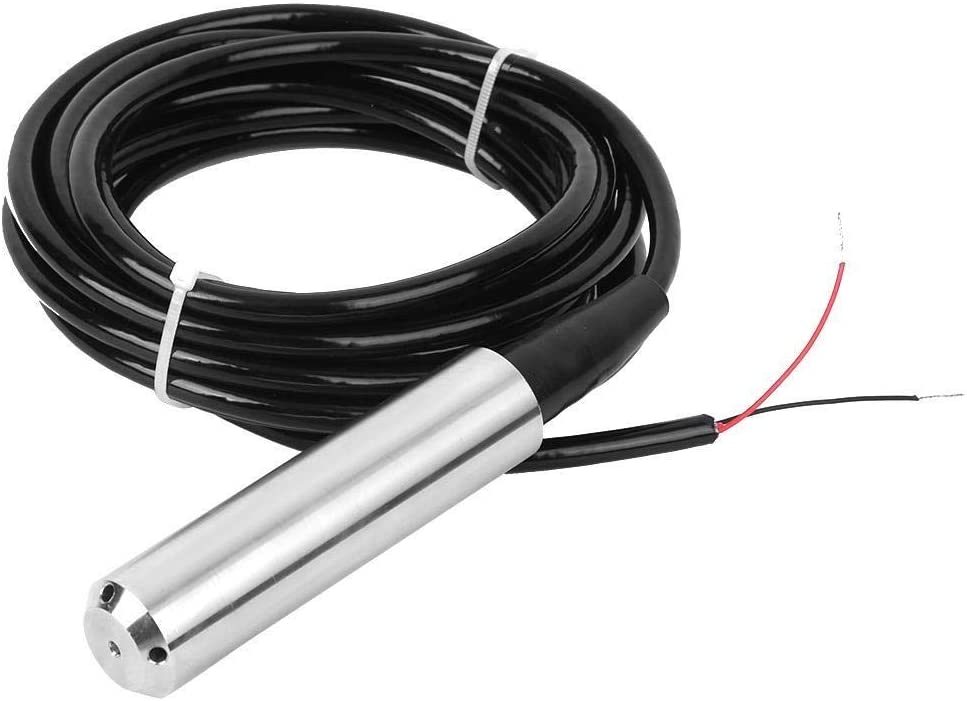
The sensor is supplied with 24 volts and converts the pressure in the range 0-20 mA. The current must therefore be measured in order to calculate the fill level and later the fill quantity. There are inexpensive small modules with a transconductance converter, i.e. the conversion of a current into a voltage. However, you can also simply use a resistor to pick up the dropped voltage.

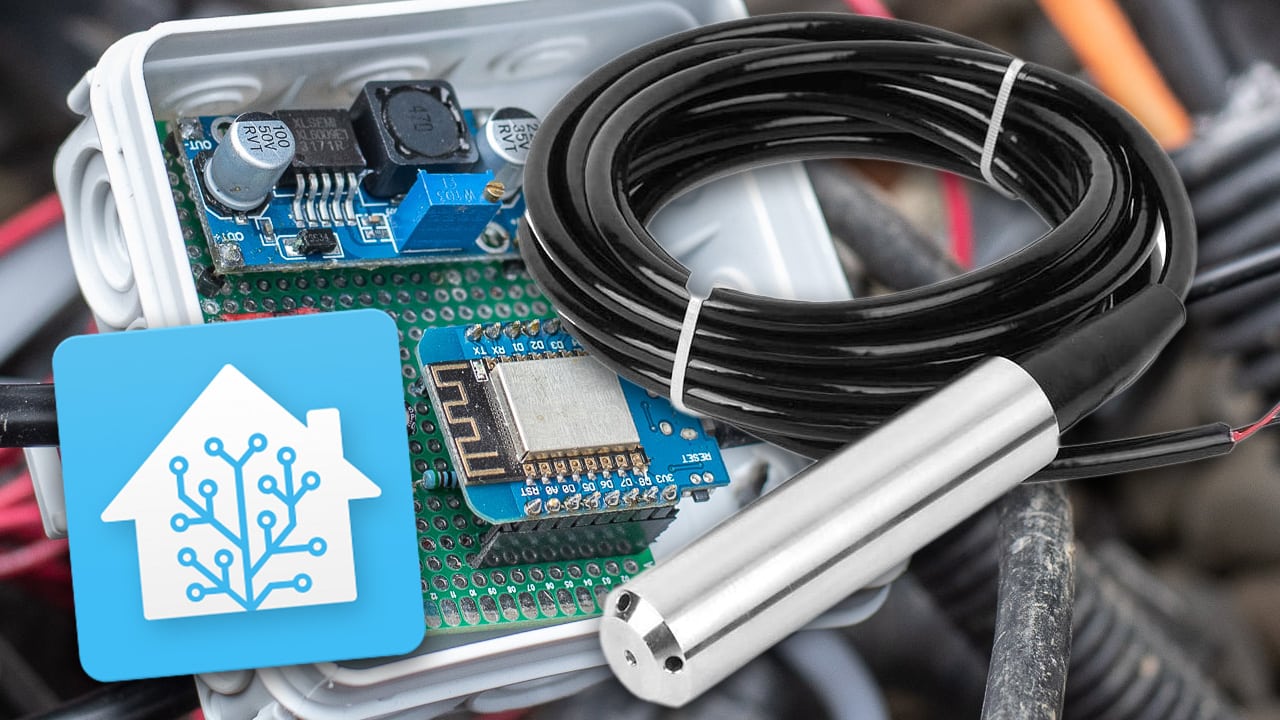
With a 150 Ohm resistor, you can tap the range up to 100 cm in such a way that it becomes a voltage with a maximum of 3.2 volts – ideal for the ADC of an ESP8266 or ESP32. With a 27 kOhm resistor in series to the analogue input of the ESP, you have additional protection, as this can tolerate a maximum of 3.3 volts. I still like to use the practical and inexpensive WeMos D1 Mini.
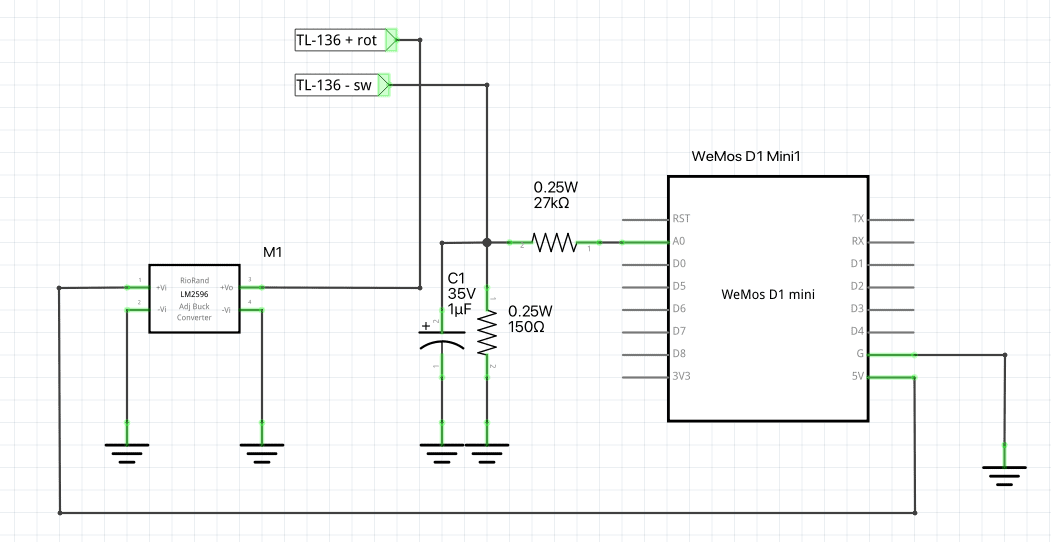
There is no need to use an additional power supply for the sensor’s 24 volts. A step-up converter does the job and can generate the 24 V from the 5 V pin of the ESP. The step-up converter is set to the required 24 V output voltage BEFORE installation.
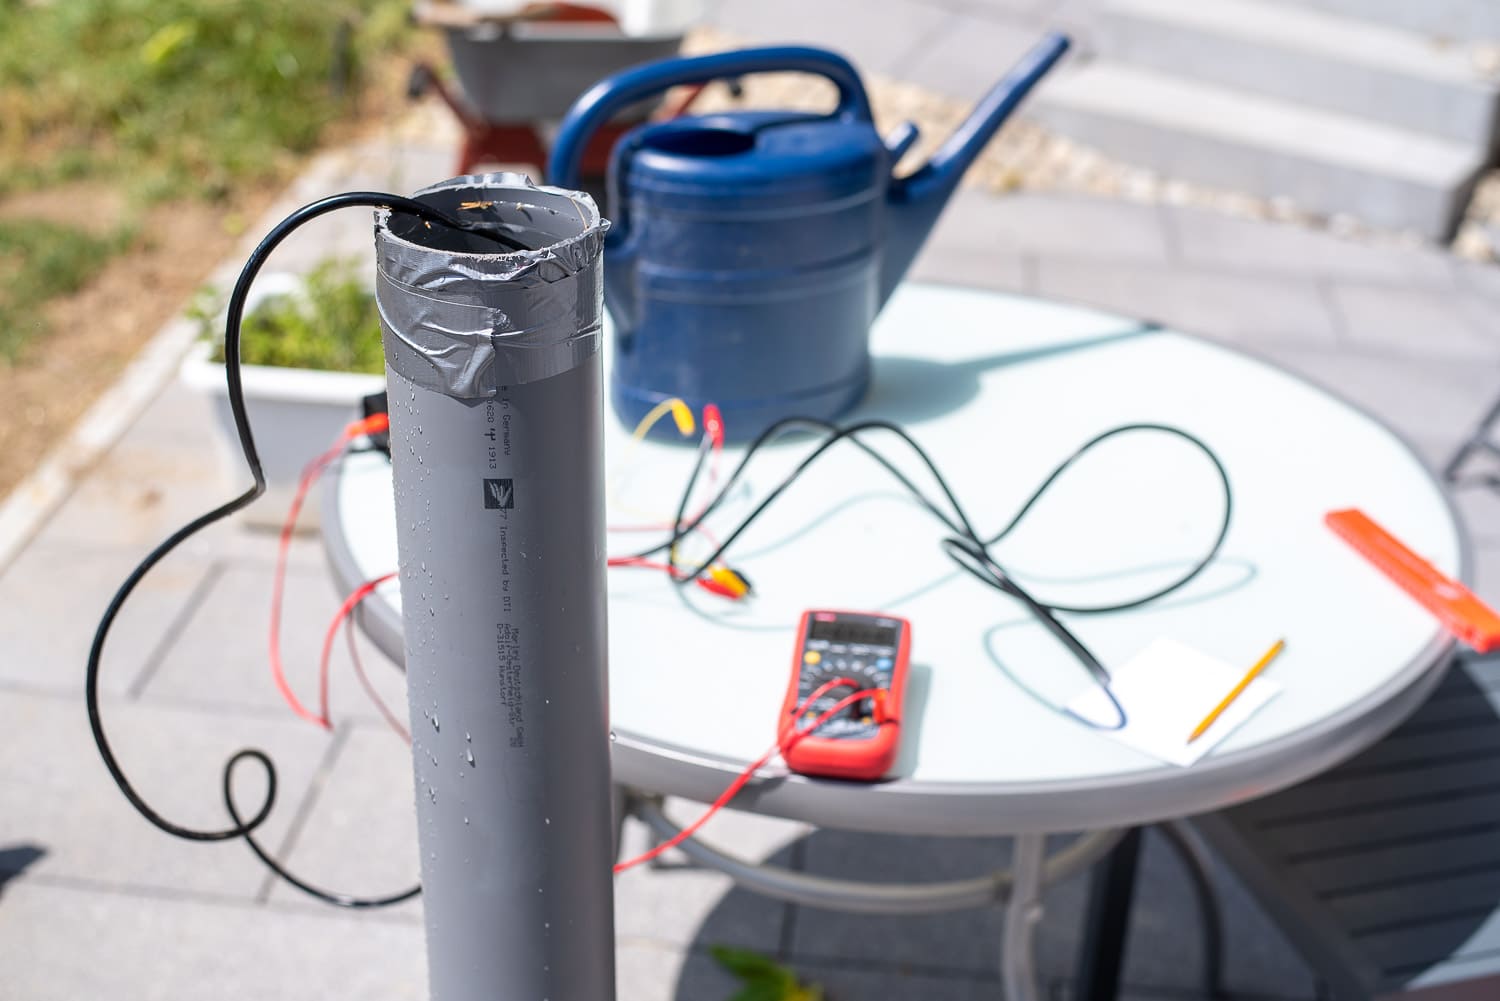
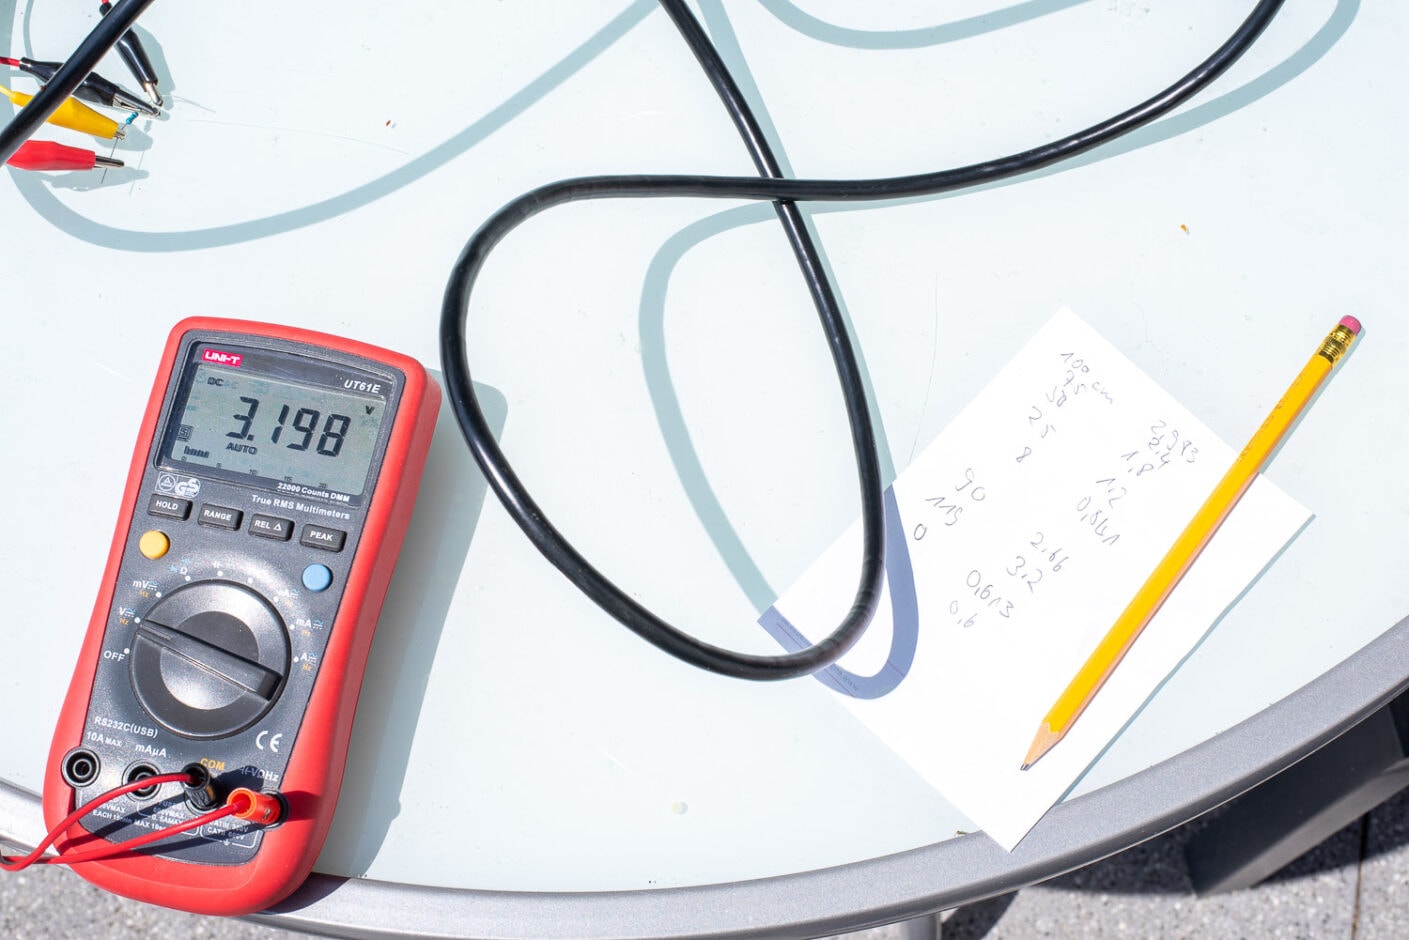
To find out which voltage is output at which fill level, I put a plug in a 100 mm HT pipe, filled it with water, immersed the sensor to different depths and measured the voltage. The hydrostatic pressure in such a pipe at the same depth is just as high as in a 5,000 litre cistern.
The ESPHome code for water level measurement
The code for the ESPHome sensor is fairly self-explanatory. The A0 pin, i.e. the analogue-digital converter, is read out. Incidentally, the ESP8266 does not output 0 – 3.3 volts here, but 0 – 1 V. I have therefore installed a filter with – multiply: 3.3. The id: levelraw allows me to access the level in centimetres again later in another function.
esphome:
  name: waterking
  platform: ESP8266
  board: d1_mini


# Enable logging
logger:
  baud_rate: 0

# Enable Home Assistant API
api:

ota:
  password: !secret ota password
wifi:
  ssid: !secret wifi_ssid
  password: !secret wifi_password

  # Enable fallback hotspot (captive portal) in case wifi connection fails
  ap:
    ssid: "Waterking Fallback Hotspot"
    password: !secret fallback password

captive_portal:


sensor:
  - platform: adc
    pin: A0
    name: "Wasserstandcm"
    id: levelraw
    update_interval: 2s
    filters:
      - multiply: 3.3
      - sliding_window_moving_average:
          window_size: 30
          send_every: 30
      - calibrate_linear:
            - 0.61 -> 0.0
            - 0.76 -> 0.075
            - 0.8 -> 0.09
            - 0.81 -> 0.1
            - 0.8411 -> 0.12
            - 0.99 -> 0.172
            - 1.04 -> 0.22
            - 1.2 -> 0.25
            - 1.8 -> 0.5
            - 2.4 -> 0.75
            - 2.66 -> 0.9
            - 2.983 -> 1.0
            - 3.2 -> 1.19
      - multiply: 100
    accuracy_decimals: 1
    unit_of_measurement: cm
    icon: "mdi:car-coolant-level"

  - platform: adc
    pin: A0
    name: "Cistern Volt"
    update_interval: 5s
    filters:
      - multiply: 3.3
      - median:
          window_size: 7
          send_every: 4
          send_first_at: 3

  - platform: template
    name: "Cistern litre"
    lambda: |-
      return id(levelraw).state;

    filters:
      - calibrate_linear:
          - 4 -> 80
          - 10 -> 200
          - 12.5 -> 300
          - 15 -> 400
          - 17.5 -> 500
          - 20 -> 600
          - 25 -> 850
          - 27.5 -> 1000
          - 40 -> 1700
          - 45 -> 2000
          - 60 -> 3000
          - 70 -> 3600
          - 80 -> 4000
          - 85 -> 4400
          - 90 -> 4700
          - 95 -> 4900
          - 100 -> 5100
    unit_of_measurement: l
    accuracy_decimals: 0

  - platform: template
    name: "Idraw"
    lambda: |-
      return id(levelraw).state;
Code language: YAML (yaml)
The median smoothes the values, as the signal is somewhat noisy. I have not yet found out why. The voltage supply of the step-up converter is stable. However, the noise is in the range of 0.5 cm fill level, which is negligible. The accuracy of the sensor itself is specified as 0.2 – 0.5 % FS. At a fill level of 0 – 1 metre, the 0.5 cm noise is exactly 0.5 % …
[Update] A 1 uF capacitor between ground and A0 provides some noise reduction and is included in the circuit diagram.
[Update 2] The A/D converter of the ESP8266 is not suitable for such measurements and does not work linearly. The Espressif data sheets say the same. That’s why I’m now using an ADS1115 AD converter, which has eliminated the noise. However, I have to recalculate the values and the cistern is currently full. An update will be coming soon.
The calibrate_linear filter converts the voltage into the actual fill level, because the sensor is not completely linear. I have determined the first values with my test setup and am now gradually correcting them with the values from the cistern. The – multiply: 100 filter ensures that the output is in centimetres.
I then query the ADC a second time to obtain an output in volts, which I can use to gradually correct the linear filter with the real fill levels.
The second function starts with – platform: template
Here I get the value in centimetres with return id(levelraw).state; and then convert it to the fill level in litres with another – calibrate_linear filter.

- Mehrschichtiger wasserdichter Schutz IP68, 45-Grad-Schrägwinkel-Anti-Schock, abnehmbarer Anti-Blocking-Schutz.
- Eingangspegelgeber, hochpräzise Diffusion von Silizium, genauere Überwachung des Wasserstandes.
- Das gemessene Medium ist Wasser, Öl und andere Flüssigkeiten, die Edelstahl nicht angreifen.

- Max. Fördermenge 6500 l/h
- Max. Förderhöhe 30 m

- Es handelt sich hierbei um ein Step-UP, Spannungsregler Aufwärtswandler oder Boost-Converter.
- Die Ausgangsspannung ist nach dem Umwandlung immer größer als die Eingangsspannung.
- Die Platine wandelt Spannungen von 3V-32V, einstellbar an dem Potentiometer in 5V – 35V Volt um.

- batteriebetriebene füllstandanzeige
- misst füllstände von wassertanks wie regenwasser, klärkammern oder gülletanks
- anzeige erfolgt nach knopfdruck über 10 led’s

- BREITER AUSGANGSVOLATFE-BEREICH – Der Strom-Spannungs-Wandler hat einen weiten Versorgungsspannungsbereich und die Ausgangsspannung unterstützt mehrere Bereiche
- EINSTELLBAR – Der Strom-Spannungs-Wandler verwendet eine ausgeklügelte Produktionstechnologie, der 0-Punkt und der Vollbereich können selbst eingestellt werden
- KUNSTSTOFFMATERIAL – Das Konvertermodul besteht aus hochwertigem Kunststoff und hat eine hohe Stabilität, gute Linearität und Industriequalität
Convert filling height to volume with level curve
My Rewatec cistern has a rather complex shape, so the fill levels in litres are not linear over the fill level. Rewatec sent me a fill level curve on request. This allows the fill level to be converted as a function of the fill level. As mentioned before: With 5,000 litres, it doesn’t matter whether 20 litres more or less are displayed. The rest is just an auxiliary function that can be omitted.
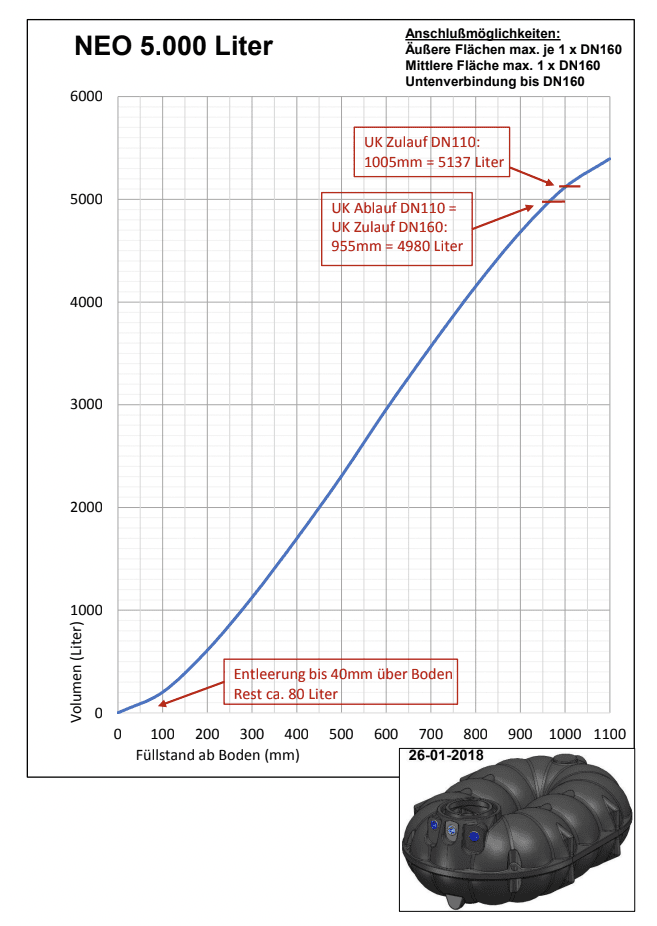
At the moment it is also very dry here, so the water level in the cistern is at a very low level of 10 – 25 centimetres and therefore 150 – 1000 litres.
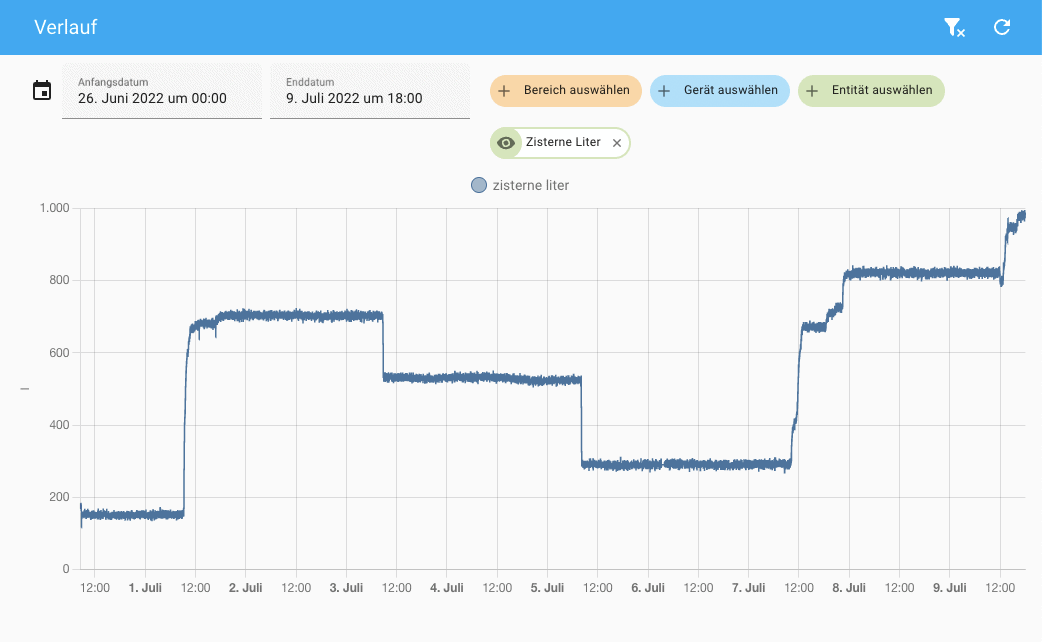
However, you can easily see the inflows and outflows and can therefore also determine how many litres 5 minutes of lawn watering is. In our case, we get about 150 litres per watering. You can also easily recognise rainfall and the rapid rise in the level.
As we also have two recessed and connected rain barrels with 1,500 litres each, I will also be installing a sensor here soon.
Overall, the solution with the TL-136 liquid level transmitters is a simple and sufficiently accurate solution for measuring fill levels. The sensors are robust and easy to control. They can be easily corrected with the linear filters of the ESPHome platform, so that an accuracy in the range of 1 % is possible. This is more than sufficient for use in rainwater barrels and cisterns.

The values obtained can be used to dynamically control the watering time, for example by shortening the watering time when there is only a little water left in the cistern.
Update 2023 – more reliable and accurate measurement
As announced last year, I have optimised the water level sensor. The problem with the original project was the poor ADC of the ESP8266, which was very noisy. In addition, the circuit with the simple measuring resistor was not particularly reliable, which was also correctly noted here in the comments. Due to the winter season and other projects, the update took a little longer than planned.
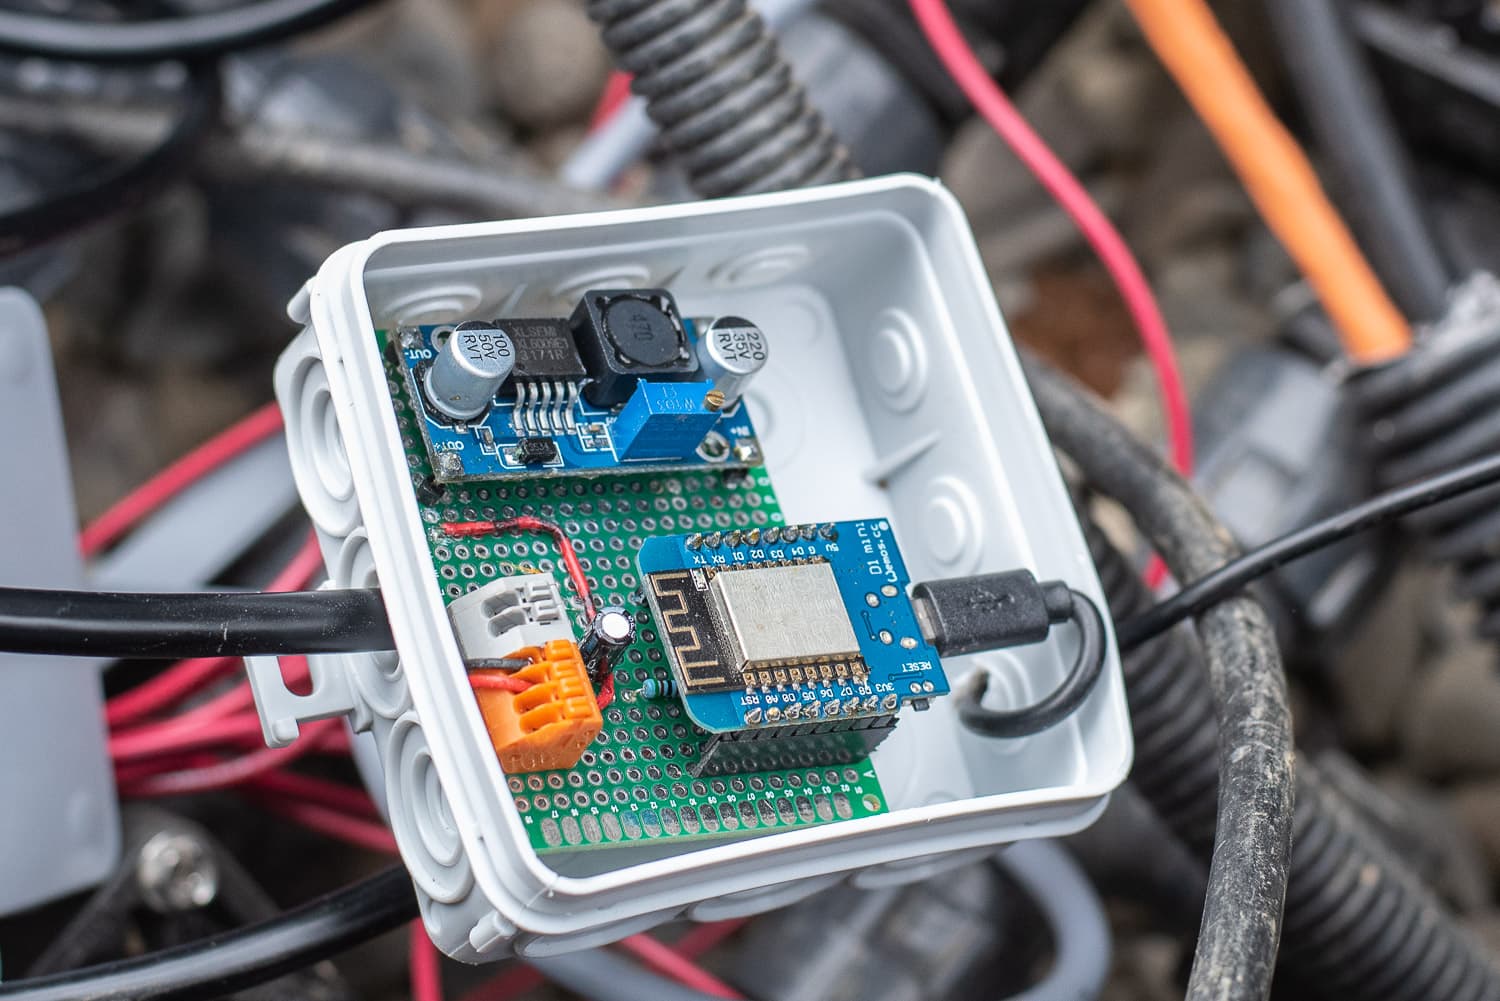
As already described, I am now using an ADS1115 4-channel ADC. You only need one of the 4 channels of the ADS1115, so you still have 3 ADCs left for other tasks.
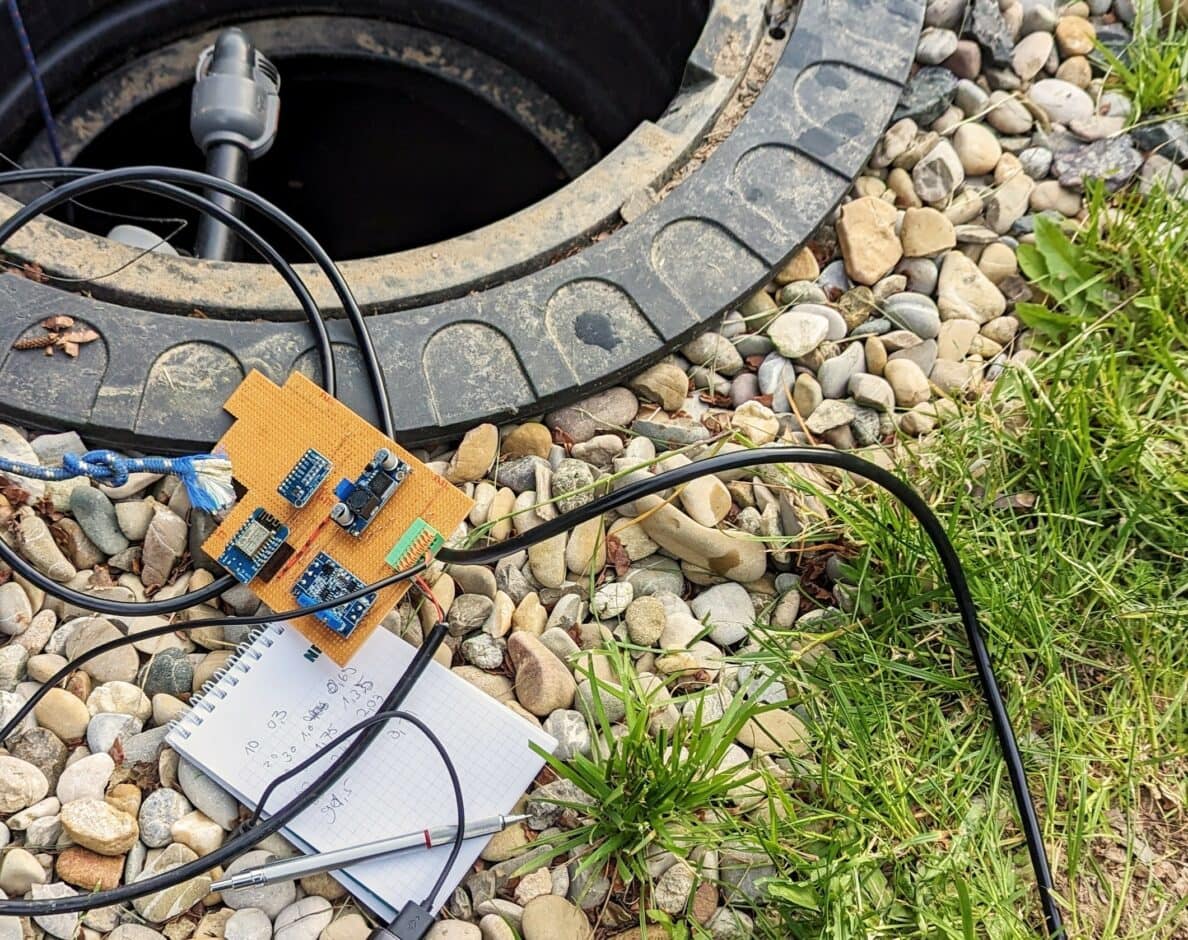
After a few tests, I also decided in favour of the inexpensive current transformer / transducer. This small module not only has the advantage that the input of the ADS1115 never sees more than 3.3 volts. All jumpers on the module are removed for this purpose. You can also set the zero point (sensor not immersed) and the maximum output voltage. This allows you to maximise the measuring range, even if you only have to measure up to a maximum of 70 cm with a 0-1 metre sensor, for example. I have desoldered the terminals so that I can solder the module to my strip grid board.
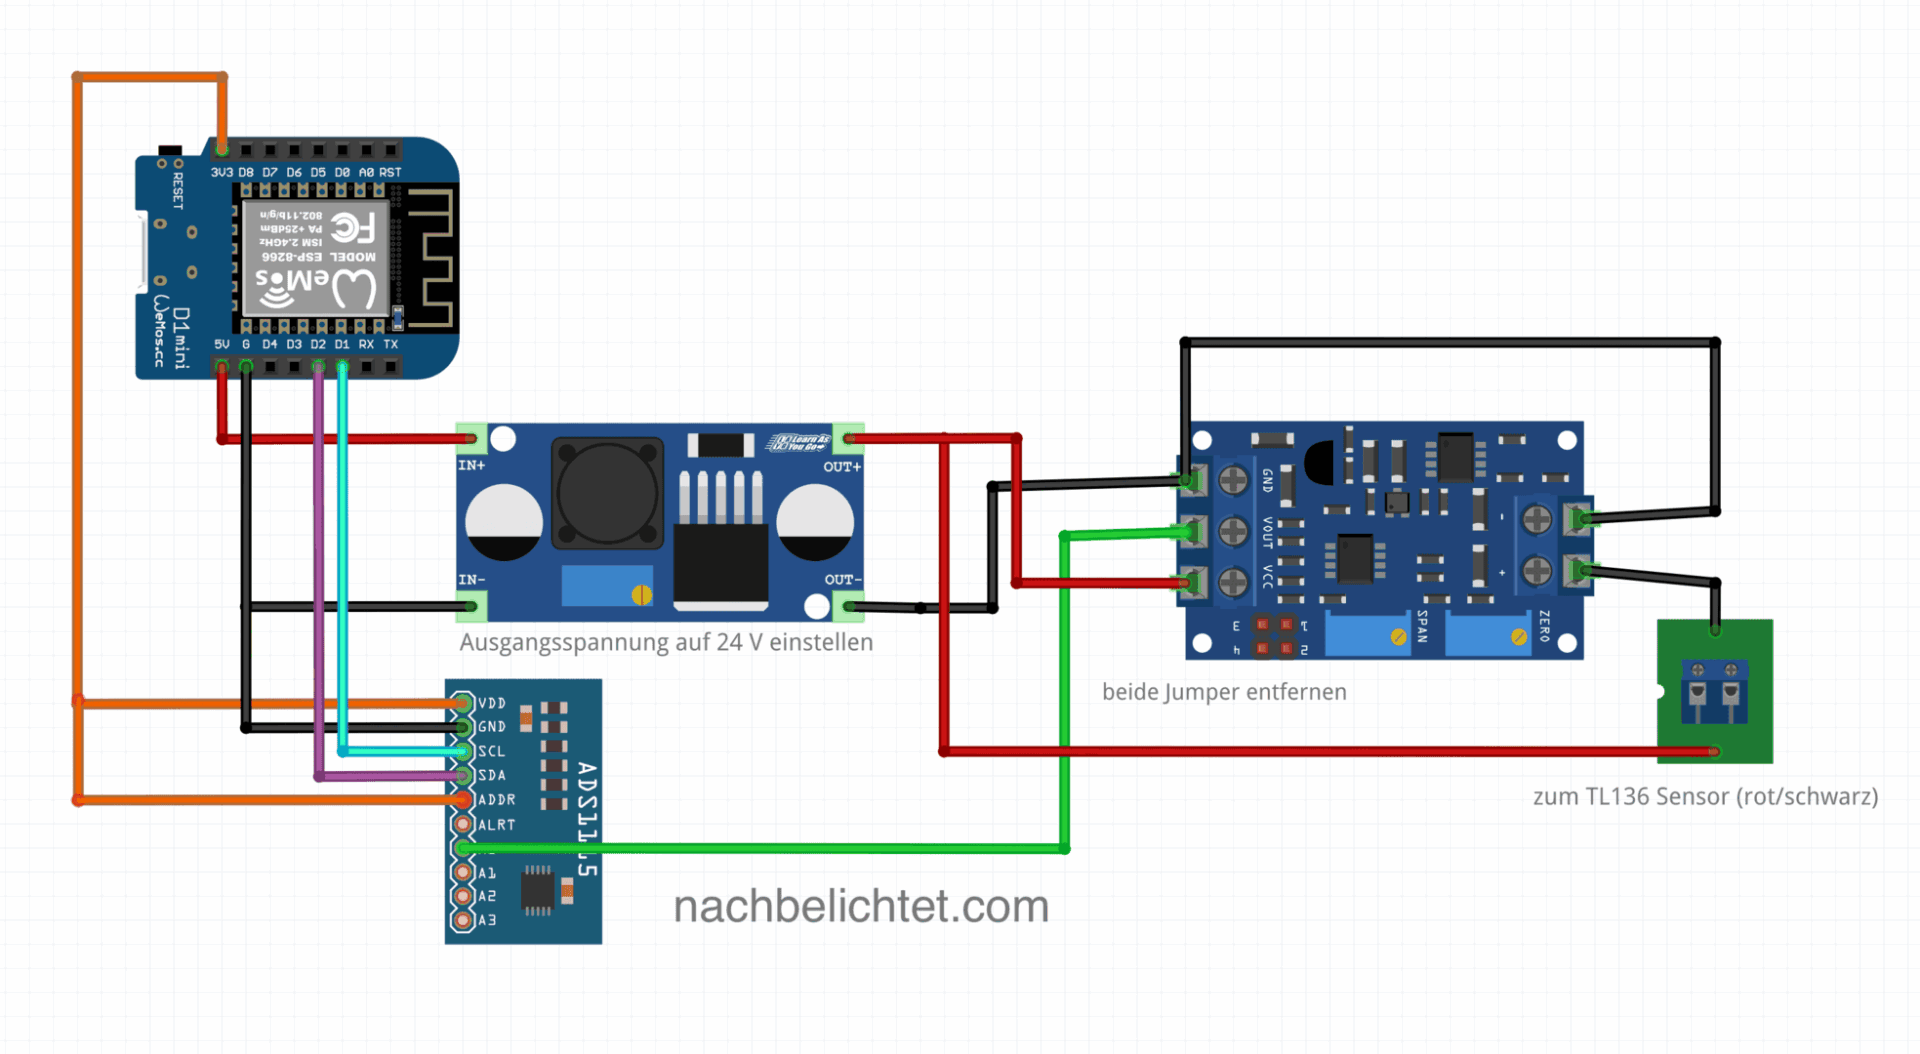
Following a tip in the comments, I had to refresh my knowledge of 4-20 mA current loops (that was almost 30 years ago and I no longer had it to hand): These current loops are very robust against interference and can be 100 m or more long. This means you can extend the TL136 sensor into the house, where the associated electronics are installed in a warm and dry place
The wiring is very simple. The ADS1115 is connected to the Wemos via I2C bus, the output of the transducer is connected to an input (ADC0 in my case) of the ADS1115.
Using the trimmer labelled “Zero” in the circuit diagram, set the output voltage of the module (green cable in the diagram) to almost 0 volts when the sensor is not immersed. Now immerse the TL136 sensor to the maximum depth at the maximum fill level and set the voltage at the output (green cable in the diagram) to just under 3.3 volts using the “Span” trimmer. This makes optimum use of the possible measuring range and gives the maximum resolution.
I again took a series of measurements in 10 cm steps and noted the corresponding voltages. As before, this is used to calculate the filling height in centimetres and from this the filling quantity according to the manufacturer’s filling diagram.
Thanks to the transducer and the ADS1115, you are rewarded with a very precise (although already excessive for the application) and noise-free measurement. The residual noise is a maximum of 0.1 % and thus corresponds to the tolerance of the TL136 sensor.
Here is a comparison of the old method with the new one, which probably speaks for itself:

Zoomed in sharply, you can see that the deviation is now only – 1mm:

The remaining ADC channels of the ADS1115 can be used, for example, for simple soil moisture sensors etc.
As there were still GPIOs free on the Wemos anyway, I also provided an input for 1-wire sensors. The inexpensive DS18B20 temperature sensors can be used, for example, to record the ground temperature, the temperature in the shed or the water temperature in the cistern. Several of these 1-wire sensors can be operated in parallel at one input.

Parts list:
- 1x Wemos Mini Pro (of course ESP32 NodeMCU etc. also work, but then with different pins)
- 1x step-up (boost) converter type XL6009 or LM2596
- 1x ADS1115 ADC module
- 1x 4-20mA transducer
- 1x TL136 sensor with the required maximum fill level
The new code with ADS1115 and 1-Wire (the 1-Wire circuit is not included in the circuit diagram – you can do it yourself if you need it 😉 !) looks like this for me:
esphome:
  name: cistern
  platform: ESP8266
  board: d1_mini


# Enable logging
logger:
  baud_rate: 0

# Enable Home Assistant API
api:

ota:
  password: !secret ota_password

wifi:
  ssid: !secret wifi_ssid
  password: !secret wifi_password
  use_address: cistern.local


  # Enable fallback hotspot (captive portal) in case wifi connection fails
  ap:
    ssid: "Waterking Fallback Hotspot"
    password: !secret fallback_password

captive_portal:

# Configure i2c bus on D1 and D2
i2c:
  id: bus_a
  sda: D2
  scl: D1
  scan: True

# 1-wire sensors on pin D4
dallas:
  - pin: D4

# Set up ADC, ADDR pin is connected to VCC, therefore address 0x49
ads1115:
  - address: 0x49
    id: ads1115_49

# ADC channel A0 for measured value acquisition
sensor:
  - platform: ads1115
    multiplexer: 'A0_GND'
    gain: 4.096
    name: "Water level cistern cm"
    id: levelraw
    update_interval: 2s
    unit_of_measurement: cm
    accuracy_decimals: 1
    icon: "mdi:car-coolant-level"
# Smooth measured values:
    filters:
      - sliding_window_moving_average:
          window_size: 20
          send_every: 20
# Convert voltages to fill level according to measurement series
      - calibrate_linear:
          - 0.0 -> 0.0
          - 0.3 -> 10
          - 0.69 -> 20
          - 1.0 -> 30
          - 1.35 -> 40
          - 1.75 -> 50
          - 2.03 -> 60
          - 2.42 -> 70
          - 2.7 -> 80
          - 3.1 -> 90

# Calculate fill quantity according to fill level curve

  - platform: template
    name: "Cistern litres"
    lambda: |-
      return id(levelraw).state;

    filters:
      - calibrate_linear:
          - 4 -> 80
          - 10 -> 200
          - 12.5 -> 300
          - 15 -> 400
          - 17.5 -> 500
          - 20 -> 600
          - 25 -> 850
          - 27.5 -> 1000
          - 40 -> 1700
          - 45 -> 2000
          - 60 -> 3000
          - 70 -> 3600
          - 80 -> 4000
          - 85 -> 4400
          - 90 -> 4700
          - 95.5 -> 4980

    unit_of_measurement: l
    accuracy_decimals: 0

# 1-wire temperature sensor

  - platform: dallas
    address: 0xef0516905a21ff28
    name: "Cistern Sens1"
    unit_of_measurement: °C
    accuracy_decimals: 1


Code language: YAML (yaml)
If you wish, you can also connect a display to show the water level, temperature etc. via the I2C bus or the Wemos SPI bus pins D5, D6 and D7. An LC display of type 1602/HD44780 or a MAX7219 7-segment display are suitable here. I also use the latter in my “Waterking” irrigation controller, which also displays the water level in the cistern.
Letzte Aktualisierung am 2026-04-06 / Affiliate Links / Bilder von der Amazon Product Advertising API


Leave a Reply to nachbelichtet Cancel reply